Your Cart is Empty

How to Steam Milk For Latte Art
How To Make A Latte
1.01 How To Froth Milk

Asaf Rauch
A Latte Art instructor, 10-year Barista & Baristaswag.com founder
About a decade ago, I first tried steaming milk. Needless to say, the results were pretty terrible 😜
Here's my tutorial to milk steaming for Cappucino, Latte & Flat White. Follow for consistently perfect milk frothing results.
Please leave your comments below or contact me with any questions, feedback. I will respond personally as soon as I'm available!
Tl;dr - Full video at the Bottom of the blog
Creating Milk foam (Microfoam)
Microfoam is the product of a properly steamed milk, using usually a steam wand of a Professional espresso machine.
It is possible to create microfoam without a professional machine, by using instead either a manual or an automatic milk frother, we will discuss these methods in later blog posts.

The equipment we are using for this tutorial

La Marzocco Linea PB
This espresso machine has been my favorite for many years. While not being too flashy, you can expect perfect results producing classic 9 bar extractions. This machine features a dual boiler system, meaning the steam for frothing is being produced and kept in a separate boiler, allowing to raise the steam pressure to my personal favorite, 1.5 bars.
You can almost any other professional machine, even single boiler machines, in order to create latte art. The recommended pressure level should be between 1 and 1.5 bars.
Ditting KE 640
Freshness is paramount! Ground coffee should be used immediately. Even a couple of minutes of exposure to air can and will reduce the quality of the espresso. Grind on demand grinders like the one we're using here are the most consistant way to produce perfect shots. while this method slows down the workflow, it undeniably produces better extractions. If you have a grinder with a ground coffee chamber, I recommend only grinding the amount you would need for your next shot - and getting a GOD grinder asap :)


Milk Pitcher
- Stainless Steel Pitcher
- Name: Color Splash
- Pitcher Spout: Ultra Sharp
- Size: 20 oz / 600 ml
For the purposes of steaming, almost any pitcher will do. You can argue that heavier and thicker frothing pitchers are more comfortable for frothing, especiialy for several beverages at a time, but if it works for you, you can keep using any pitcher you acheive great results with.
We will discuss more coffee art equipment in future posts.
Best Barista Milk for Latte Art?
I would argue that almost any milk can be used for latte art, the main difference will be in the taste and steamed milk texture. For ease of milk frothing, I recommend using fresh 3-3.5% fat. Most importantly, keep the milk refrigirated to approximately 4 degrees Celsius.
We will explore frothing various different milk types in future blog posts.
Step by step milk steaming

Step 1 – Filling up the pitcher
The amount of milk in the steaming pitcher is imperative, use too little or too much and it can become impossible to froth properly. The best way to know you have the perfect amount is weigh the milk in the milk pitcher. After doing so for a few times, you will be able to asses the right amount to fill by eye. In this case we are using a 270ml cup, 50 ml espresso and 235ml of milk (there will be a little left over milk).
We recommend the Ultra Sharp Series Milk Frothing Pitcher.
Step 2 – Incorporate air into the milk
Steam is water vapor, it in itself does not contain air. Instead, we use it to “push” the room air into the milk. The amount of air we want to introduce into the milk depends on the beverage we are making. When making a cappuccino we will “stretch” the milk a little longer and less for lattes and flat whites. I find that the ideal amount of foam in a milk coffee is around 1-2cm, you will notice I’m frothing for only X Seconds and then I raise the pitcher and the hissing sound stops.

Notice in the picture above how we position the tip of the milk steamer (= Steam Wand) approximately 1 cm below the surface of the milk. We try to keep it close, but not touching, the wall of the pitcher. One hand stays on the outside of the pitcher to gauge the temperature of the milk. I recommend varifying the temperature with a thermometer for the first few weeks to get a good sense of the temperature, eventually you will feel confident you got the right temp even without using a thermometer.
Step 3 – Milk Texture
Now that we have incorporated the amount of foam we want, we move on to texturing the milk by creating a fast spinning motion of the milk foam. The more time we spend on spinning instead of introducing air, the smoother our final microfoam will be. So we would want to aerate quickly, and spend the rest of the process spinning the milk. We stop the steaming once we reach the ideal milk frothing temperature, which is usually considered to be between 65 and 70 degrees Celsius (150-160 Fahrenheit)
Step 4 – Final touches
After we’re done steaming (and cleaned the steam want of course), we want to tap the pitcher on a solid surface. We swirl the milk around for a few seconds in a tight but fast motion. We can now assess the result and decide whether we frothed the right amount. In case we frothed too little, there is no way around but having another go. In case we frothed too much, we can dump some of the froth out, either by using a spoon or by pouring milk but mainly froth out. The final result should look like this:
As you can see, the milk is not too heavy and does not spin around for too long once we stop swirling it. The microfoam is shiny and without any visible bubbles.
Full Milk Steaming Video
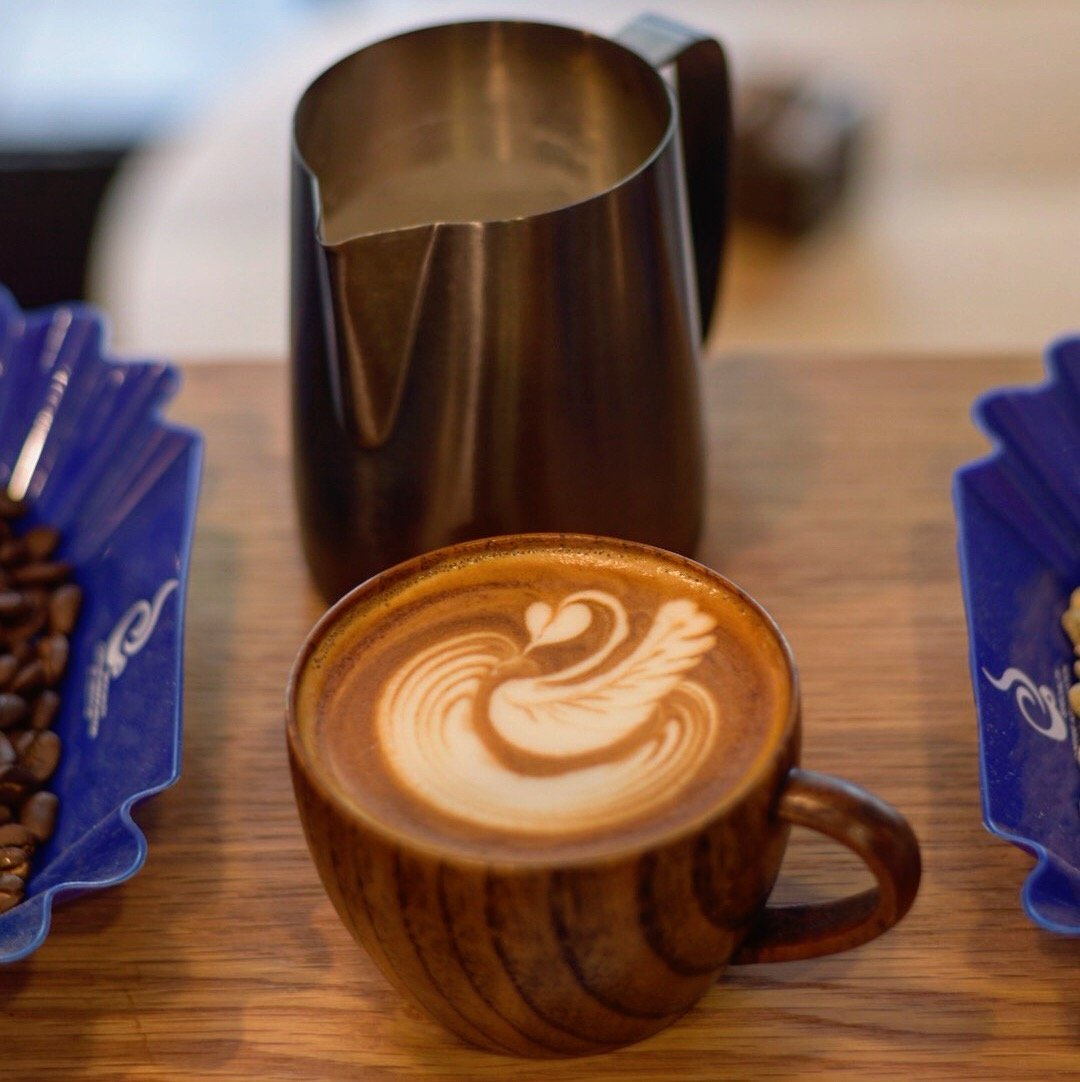
Step 5 – Free Pour Latte Art
In this pour I went with the most basic version of the Tulip Latte Art pattern. In the future I will be showing how to approach free pour, and introduce new tutorials on increasingly difficult and trending latte art patterns.
My favorite style of Latte Art or Cappuccino Art is the free pour, in future post we will discuss latte art etching and other styles as well.
Hope this tutorial helped a little. Please feel free to leave a comment and/or send me an e-mail at asaf@baristaswag.com. I’m always happy to help!